
Bienvenido a la sección de ayuda
Edit community Meeting
Once you have added a Community Meeting, you will be taken back to the same menu where you can, add more meetings or start the using the options available for each Meeting. If you have added more than one meeting which are in different years, you will notice that the most recent o r future meeting is visible at the top, while all others are grouped by year below the first meeting.
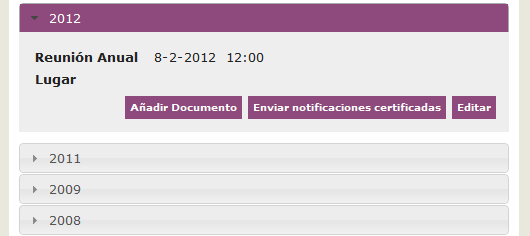
You can use the arrows next to the “year” to open or close each window in order to access and view meetings for that calendar year and also to add files or send notifications of the minutes or call for meetings.
Note: You can have more than one meeting per year. In which case both meetings will show under the same tab, but are separated in different light gray boxes.
For each meeting you have 3 options:
- Edit
- Add File
- Send Registered Notifications
- Edit: This option allows you to update and make changes to the Meeting Type, Venue, Date and Time as explained in the Add Meeting section. The interface is exactly the same as Add Meeting and all you have to do is Edit and Save changes.
-
Add File: This option allows you to upload meeting notes and files for that particular meeting. You will note that the meeting for which you will be adding the file for is specified. You can easily click “Browse” to locate the file on your computer and then write a short description for the file, such as “AGM minutes” or “Budget Proposal”. Click Save and you will be returned the Community Meeting page, where you can Add more files or perform other actions.
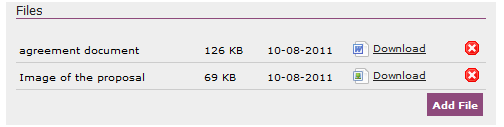
The files will be listed immediately under each meeting, where the description, size, date uploaded and the type of file is visible to all owners with a Download option, see Figure 3.6. Once you have added a file, you will always be able to delete it using the "x" icon.
- Send Registered Notifications: This is equivalent to registered post. This option is only available in the Premium and licensed version of OCM. In order to use this service you must be ensure that you have approved Electronic Communication in one of your Community meetings. (To receive a copy of the Electronic Communication text that can be included in your meetings for approval please email support@urbytus.com).
NOTE: Registered notifications send an email (see example later on) to the users on informing them that a notification has been sent to their inbox in OCM. In order for the user to see the notification they will have to login to the website, which requires them to authenticate themselves.
This first authentication provides the first part of the log, where it provides proof that the user has received the notification and logged into the website.
As soon as they login, they are also prompted with a message box, informing the user that they have New Mail in their inbox.
Finally when the user opens their inbox and subsequently reads the message, the system logs the time and date once again.
Through this method you have a 3 point verification of 1. Delivery, 2. Receipt and 3. Read, which can be used as legal confirmation. (OCM terms and conditions states that the user once confirming their status and preference in receiving communication in electronic format and by accepting the Terms and Conditions, understands that they are required to login periodically to receive and read new messages and that they are responsible for keeping their contact information upto date).
Related Help files
[Languages Available]